

Accounts
Configure bank accounts, manage account groups, and maintain account properties in tenant settings
Introduction
The accounts settings section provides administrative control over your organization's bank accounts within FinologeeBKO. This interface enables administrators to add new accounts, view account details, configure account properties, manage account aliases, and organize accounts into logical groups for better management and signatory rule configuration.
Users with the appropriate right can add new bank accounts directly through this interface, individually or in bulk, without depending on customer support for every onboarding. Administrators can also edit account properties, manage group memberships, and deactivate accounts that are no longer needed. Account groups provide organizational structure that can be used to scope permissions, define signatory rules, and simplify account management across business units or functional areas.
Account monitoring vs. account configurationThis section covers administrative account configuration in Tenant Settings. For viewing account balances, transactions, and statements, see Cash Accounts - Account balances and bank statements.
Prerequisites
Before managing account settings, ensure you have the appropriate administrative permissions and understand the approval workflow for configuration changes.
Permissions
| Permission | Description |
|---|---|
TENANT_SETTINGS_READ | View account configurations, properties, and group memberships |
TENANT_SETTINGS_WRITE | Edit account details, manage group membership, deactivate accounts |
TENANT_SETTINGS_APPROVE | Approve pending account configuration changes |
ORDERING_PARTY_ACCOUNT_CREATE | Add bank accounts through the UI or API, individually or in bulk |
ORDERING_PARTY_ACCOUNT_SKIP_CHECK | Add bank accounts directly in Active status, skipping the pending activation stage |
Permission inheritanceUsers with
ORDERING_PARTY_BALANCE_READpermission can view accounts in the Bank Accounts section but cannot modify account configurations in Tenant Settings.
Feature flags
| Feature Flag | Description |
|---|---|
TENANT_SETTINGS_FOUR_EYES_REVIEW | When enabled, all account configuration changes require approval before taking effect. See Pending Changes - Configuration change management. |
Accounts overview
The accounts section in Tenant Settings displays all bank accounts configured for your tenant, organized in a table format with key account properties visible at a glance. The list includes a Status column by default, helping administrators identify accounts still awaiting activation. Administrators can switch between viewing individual accounts and viewing accounts organized by account groups.
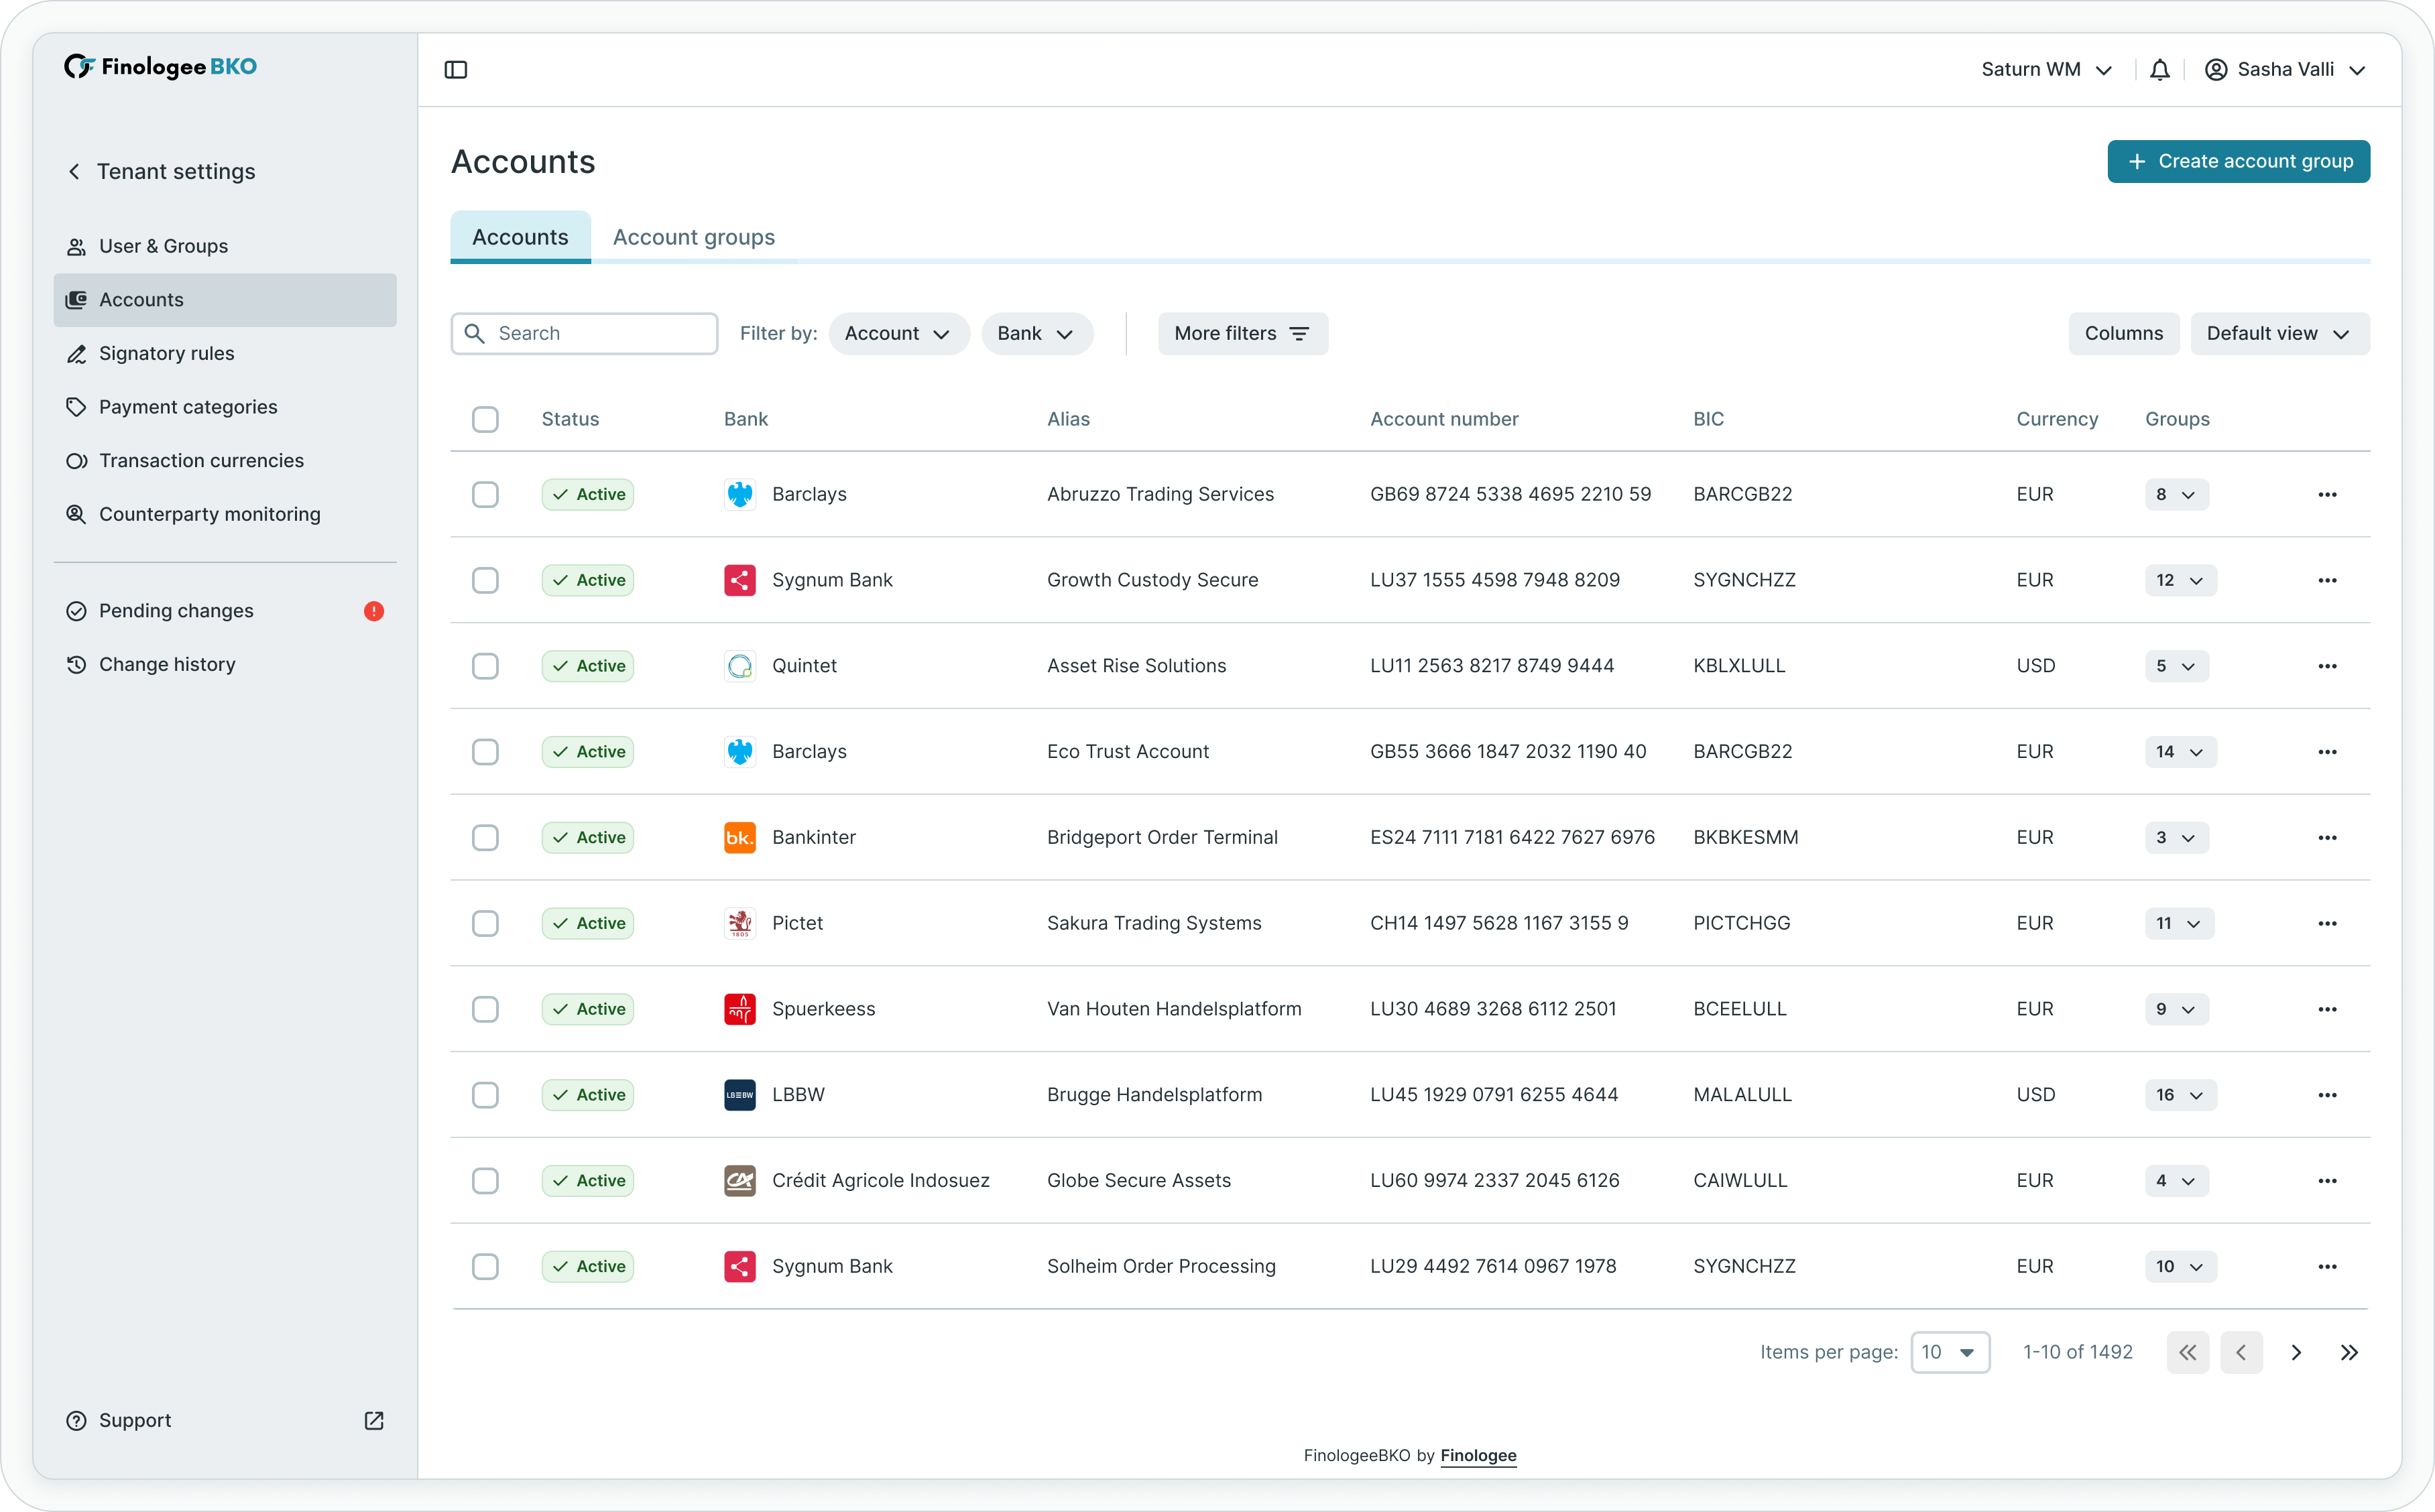
The accounts list displays essential information for each account including bank name, IBAN, BIC, currency, ordering party name, current balance information, and status. Each account row provides access to actions through the action menu, enabling quick access to editing, group management, and deactivation functions.
Key components
The accounts interface consists of two main views:
| View | Purpose |
|---|---|
| Accounts list | Displays all bank accounts with their properties and status |
| Account groups | Shows defined account groups and their member accounts |
Administrators can toggle between these views to manage individual accounts or work with account groupings depending on the task at hand.
Adding accounts
Users with the ORDERING_PARTY_ACCOUNT_CREATE permission can add new bank accounts directly in Tenant Settings, individually through a form, or in bulk through a file upload for larger onboarding volumes.
Adding a single account
To add a single account:
- Navigate to Tenant settings → Accounts
- Click Add account
- Enter the account details:
- Account name - name displayed on payment instructions (up to 35 characters)
- Account alias - internal reference (up to 70 characters)
- Account number - IBAN or local account number
- BIC - bank code, auto-populated when the account number is a recognized IBAN, fully editable
- Currency - account denomination (multi-currency accounts require a separate entry per currency)
- Address - account holder address
- Statement matching number - optional alternative account identifier used by the bank to match statements (up to 34 characters, spaces allowed); relevant for multicurrency accounts where several sub-accounts share the same IBAN at bank level. When left empty, FinologeeBKO stores the account's IBAN as the statement matching number.
- Assign the account to one or more account groups (optional second step)
- Save the account
If the BIC does not match an existing bank in your tenant, FinologeeBKO creates the bank automatically using reference data from the SWIFT registry.
Adding accounts in bulk
To add multiple accounts at once:
- Navigate to Tenant settings → Accounts
- Download the bulk upload template
- Complete the template with the accounts to add, following the same fields as adding a single account, including an optional group names column (comma-separated, following the same pattern as counterparty bulk upload) and an optional statement matching number column, added as the last column in the template
- Upload the completed file
- Review the validation results. If any row fails validation, the system rejects the entire batch and provides a downloadable error file listing every issue
- Correct the file and re-upload if needed
- Confirm the upload to add all validated accounts
All-or-nothing validationBulk account upload follows the same two-step, all-or-nothing validation pattern as counterparty bulk upload: upload and validate, then confirm and persist. No accounts are added until the entire file passes validation.
When the four-eyes review feature is enabled, new accounts are added in edit mode and follow the standard tenant settings approval flow before taking effect.
Account activation
New accounts start in Pending or Pending bank connectivity status and do not appear in bank account lists or ordering party selectors used for payment creation until activated. FinologeeBKO activates an account automatically once bank connectivity is confirmed, typically when the first bank statement for that account is received.
Users with the ORDERING_PARTY_ACCOUNT_SKIP_CHECK permission can add accounts that go directly to Active status, bypassing the pending stage.
Viewing account details
Each account in the list can be expanded to view detailed information about the account configuration, bank relationship, and current status.
Account properties
The account details screen displays comprehensive information organized into logical sections:
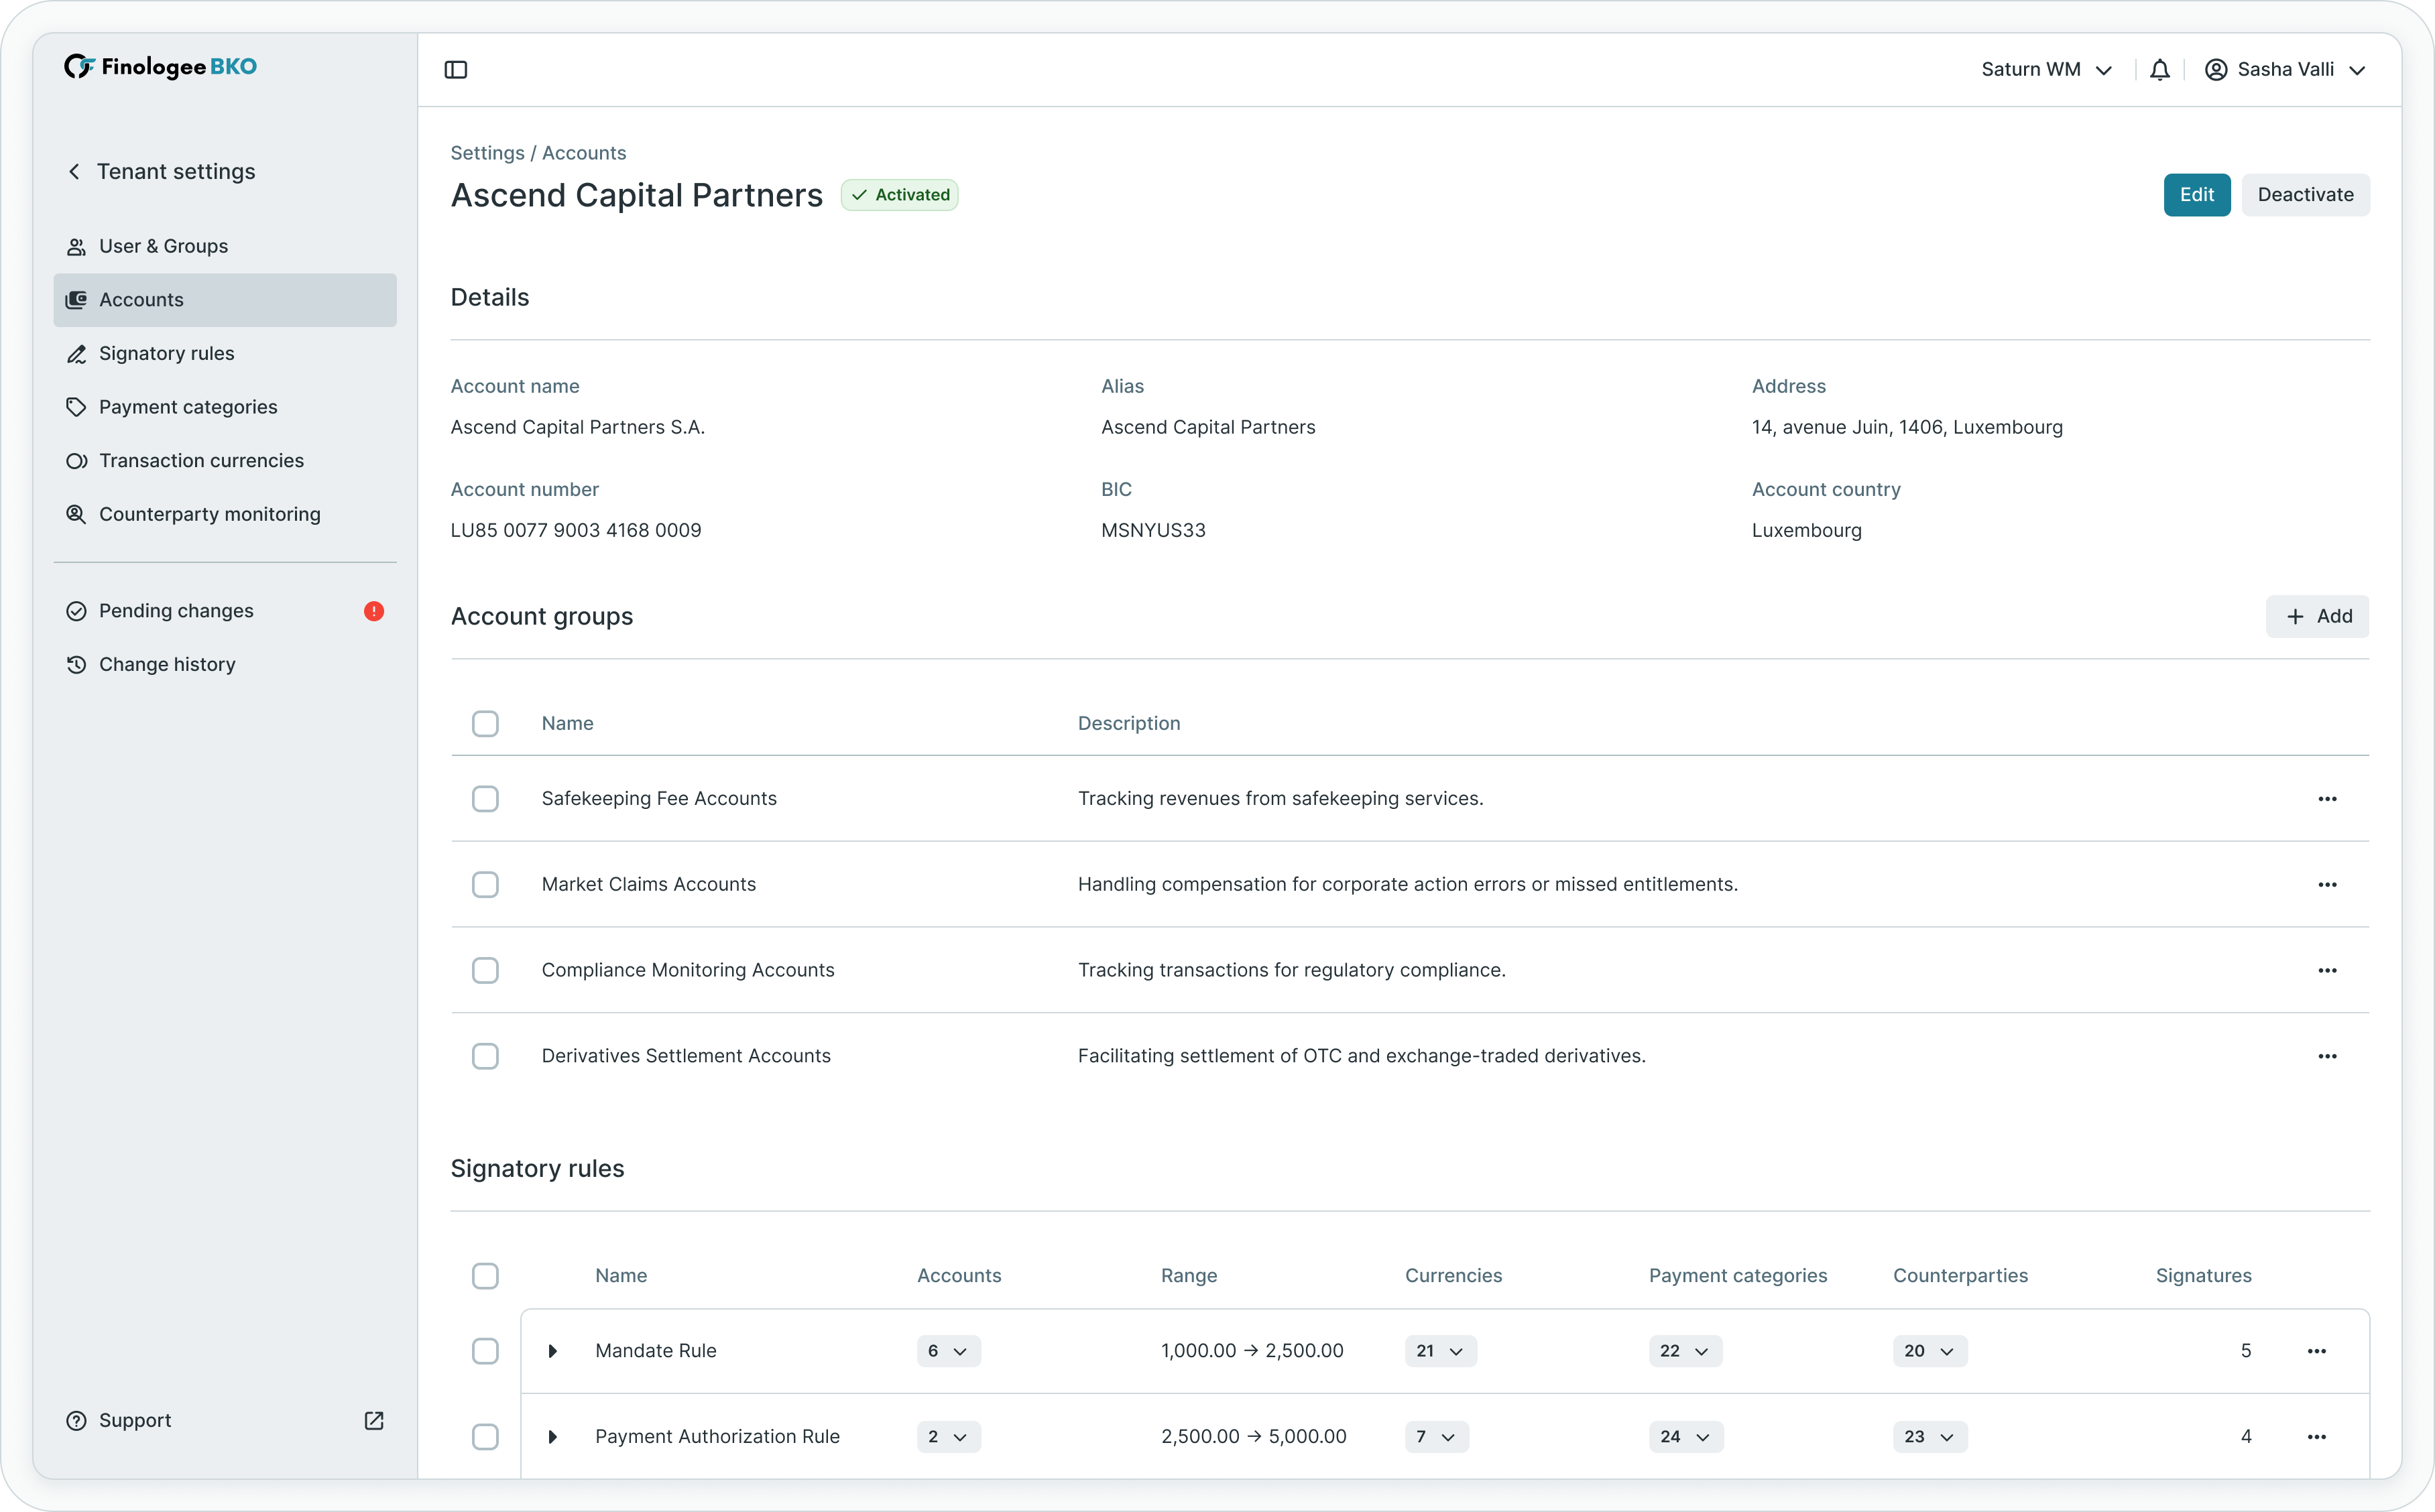
| Property | Description |
|---|---|
| IBAN | International Bank Account Number (immutable after the account is added) |
| Statement matching number | Alternative account identifier used by the bank to match statements; shown only when it differs from the account number |
| BIC/SWIFT | Bank Identifier Code for the account's bank |
| Currency | Account denomination currency |
| Bank name | Name of the banking institution |
| Country | Country of account jurisdiction (immutable after the account is added) |
| Ordering party name | Legal entity name displayed on payment instructions |
| Alias | User-defined identifier for easier account recognition |
| Account groups | Groups to which this account belongs |
| Status | Current activation status of the account |
Balance information
The account details include current balance data received from bank statements:
| Balance Type | Description |
|---|---|
| Closing balance | Most recent end-of-day balance from bank statements |
| Intraday balance | Latest intraday balance reflecting same-day transactions |
| Balance date | Date and time of the most recent balance update |
Balance data sourceBalance information displayed in Tenant Settings is derived from received bank statements (MT940/CAMT.053). For detailed balance monitoring and evolution tracking, see Cash Accounts - Account balances and bank statements.
Editing account details
Administrators can modify certain account properties to maintain accurate information and improve account identification within the organization.
Editable properties
The following account properties can be updated through the settings interface:
| Property | Editable | Notes |
|---|---|---|
| Ordering party name | Yes | Name displayed on payment instructions |
| Alias | Yes | Internal identifier for easier recognition |
| Statement matching number | Yes | Optional, up to 34 characters, spaces allowed; when cleared, FinologeeBKO stores the account's IBAN as the value |
| Account group membership | Yes | Add or remove group associations |
| IBAN | No | Immutable after the account is added |
| BIC | No | Determined by bank relationship |
| Currency | No | Fixed at account level |
| Country | No | Jurisdiction cannot be changed |
Editing an account
To edit account properties:
- Navigate to Tenant settings → Accounts
- Locate the account to edit in the list
- Click the action menu (three dots) and select Edit, or click on the account row and then the Edit button
- Modify the editable properties as needed
- Save the changes
When the four-eyes review feature is enabled, changes enter a pending state and require approval before becoming effective.
Statement matching number changesUpdates to the statement matching number follow the same tenant settings approval workflow as other account edits and appear on the Pending Changes page before taking effect. Approved changes are recorded in the account's change history, showing the previous and updated values.
Ordering party name and alias
The ordering party name appears on payment instructions sent to banks and identifies your organization on bank statements. The alias provides an internal reference that can be customized for easier identification, particularly useful when managing multiple accounts with similar names or across different business units.
Account groups
Account groups provide a mechanism to organize accounts into logical collections based on business structure, functional purpose, currency, region, or any organizational criteria relevant to your operations.
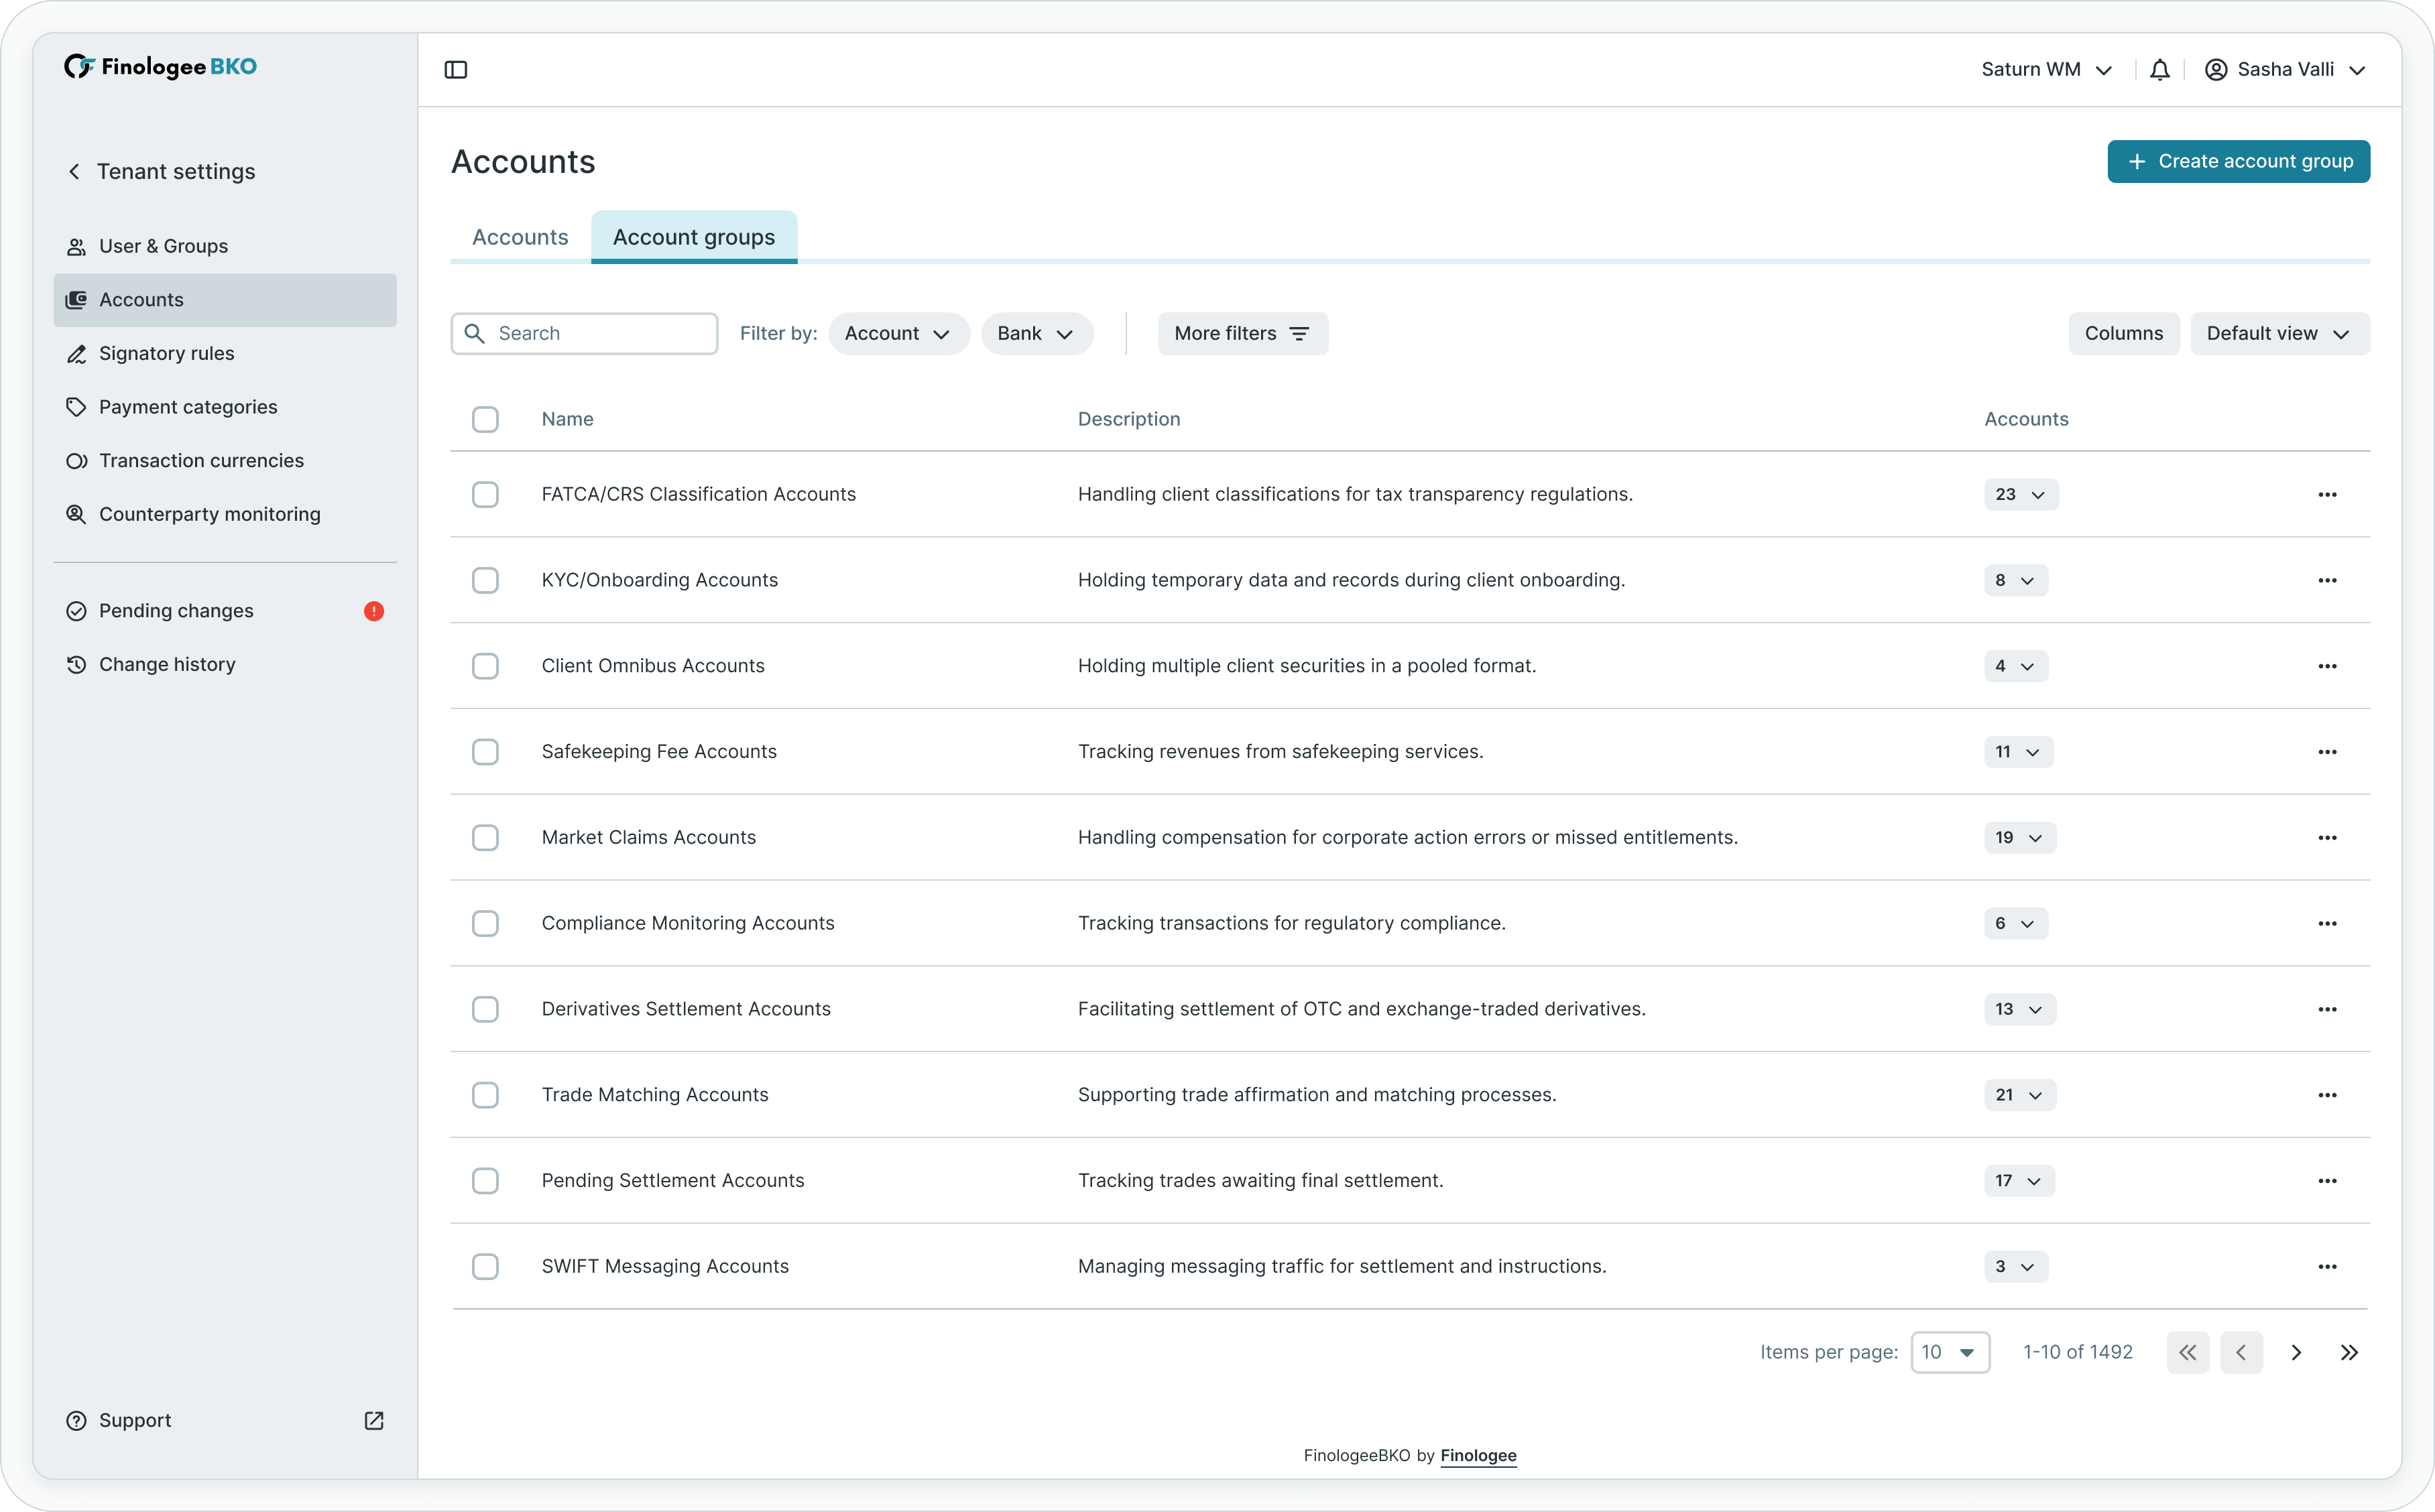
Benefits of account groups
Account groups serve multiple purposes within FinologeeBKO:
| Use Case | Description |
|---|---|
| Organizational structure | Reflect business units, subsidiaries, or departments |
| Signatory rule scoping | Define approval requirements at group level rather than individual accounts |
| Permission scoping | Grant users access to specific account groups |
| Reporting and analysis | View aggregated data by account group in dashboards |
| Simplified management | Apply changes to groups rather than individual accounts |
Creating an account group
To create a new account group:
- Navigate to Tenant settings → Accounts and switch to the Account Groups view
- Click New account group
- Enter a descriptive group name
- Optionally add member accounts during creation or add them later
- Save the group
Account group details
Each account group displays summary information including the group name, number of member accounts, and aggregated balance across all accounts in the group (converted to the tenant's base currency).
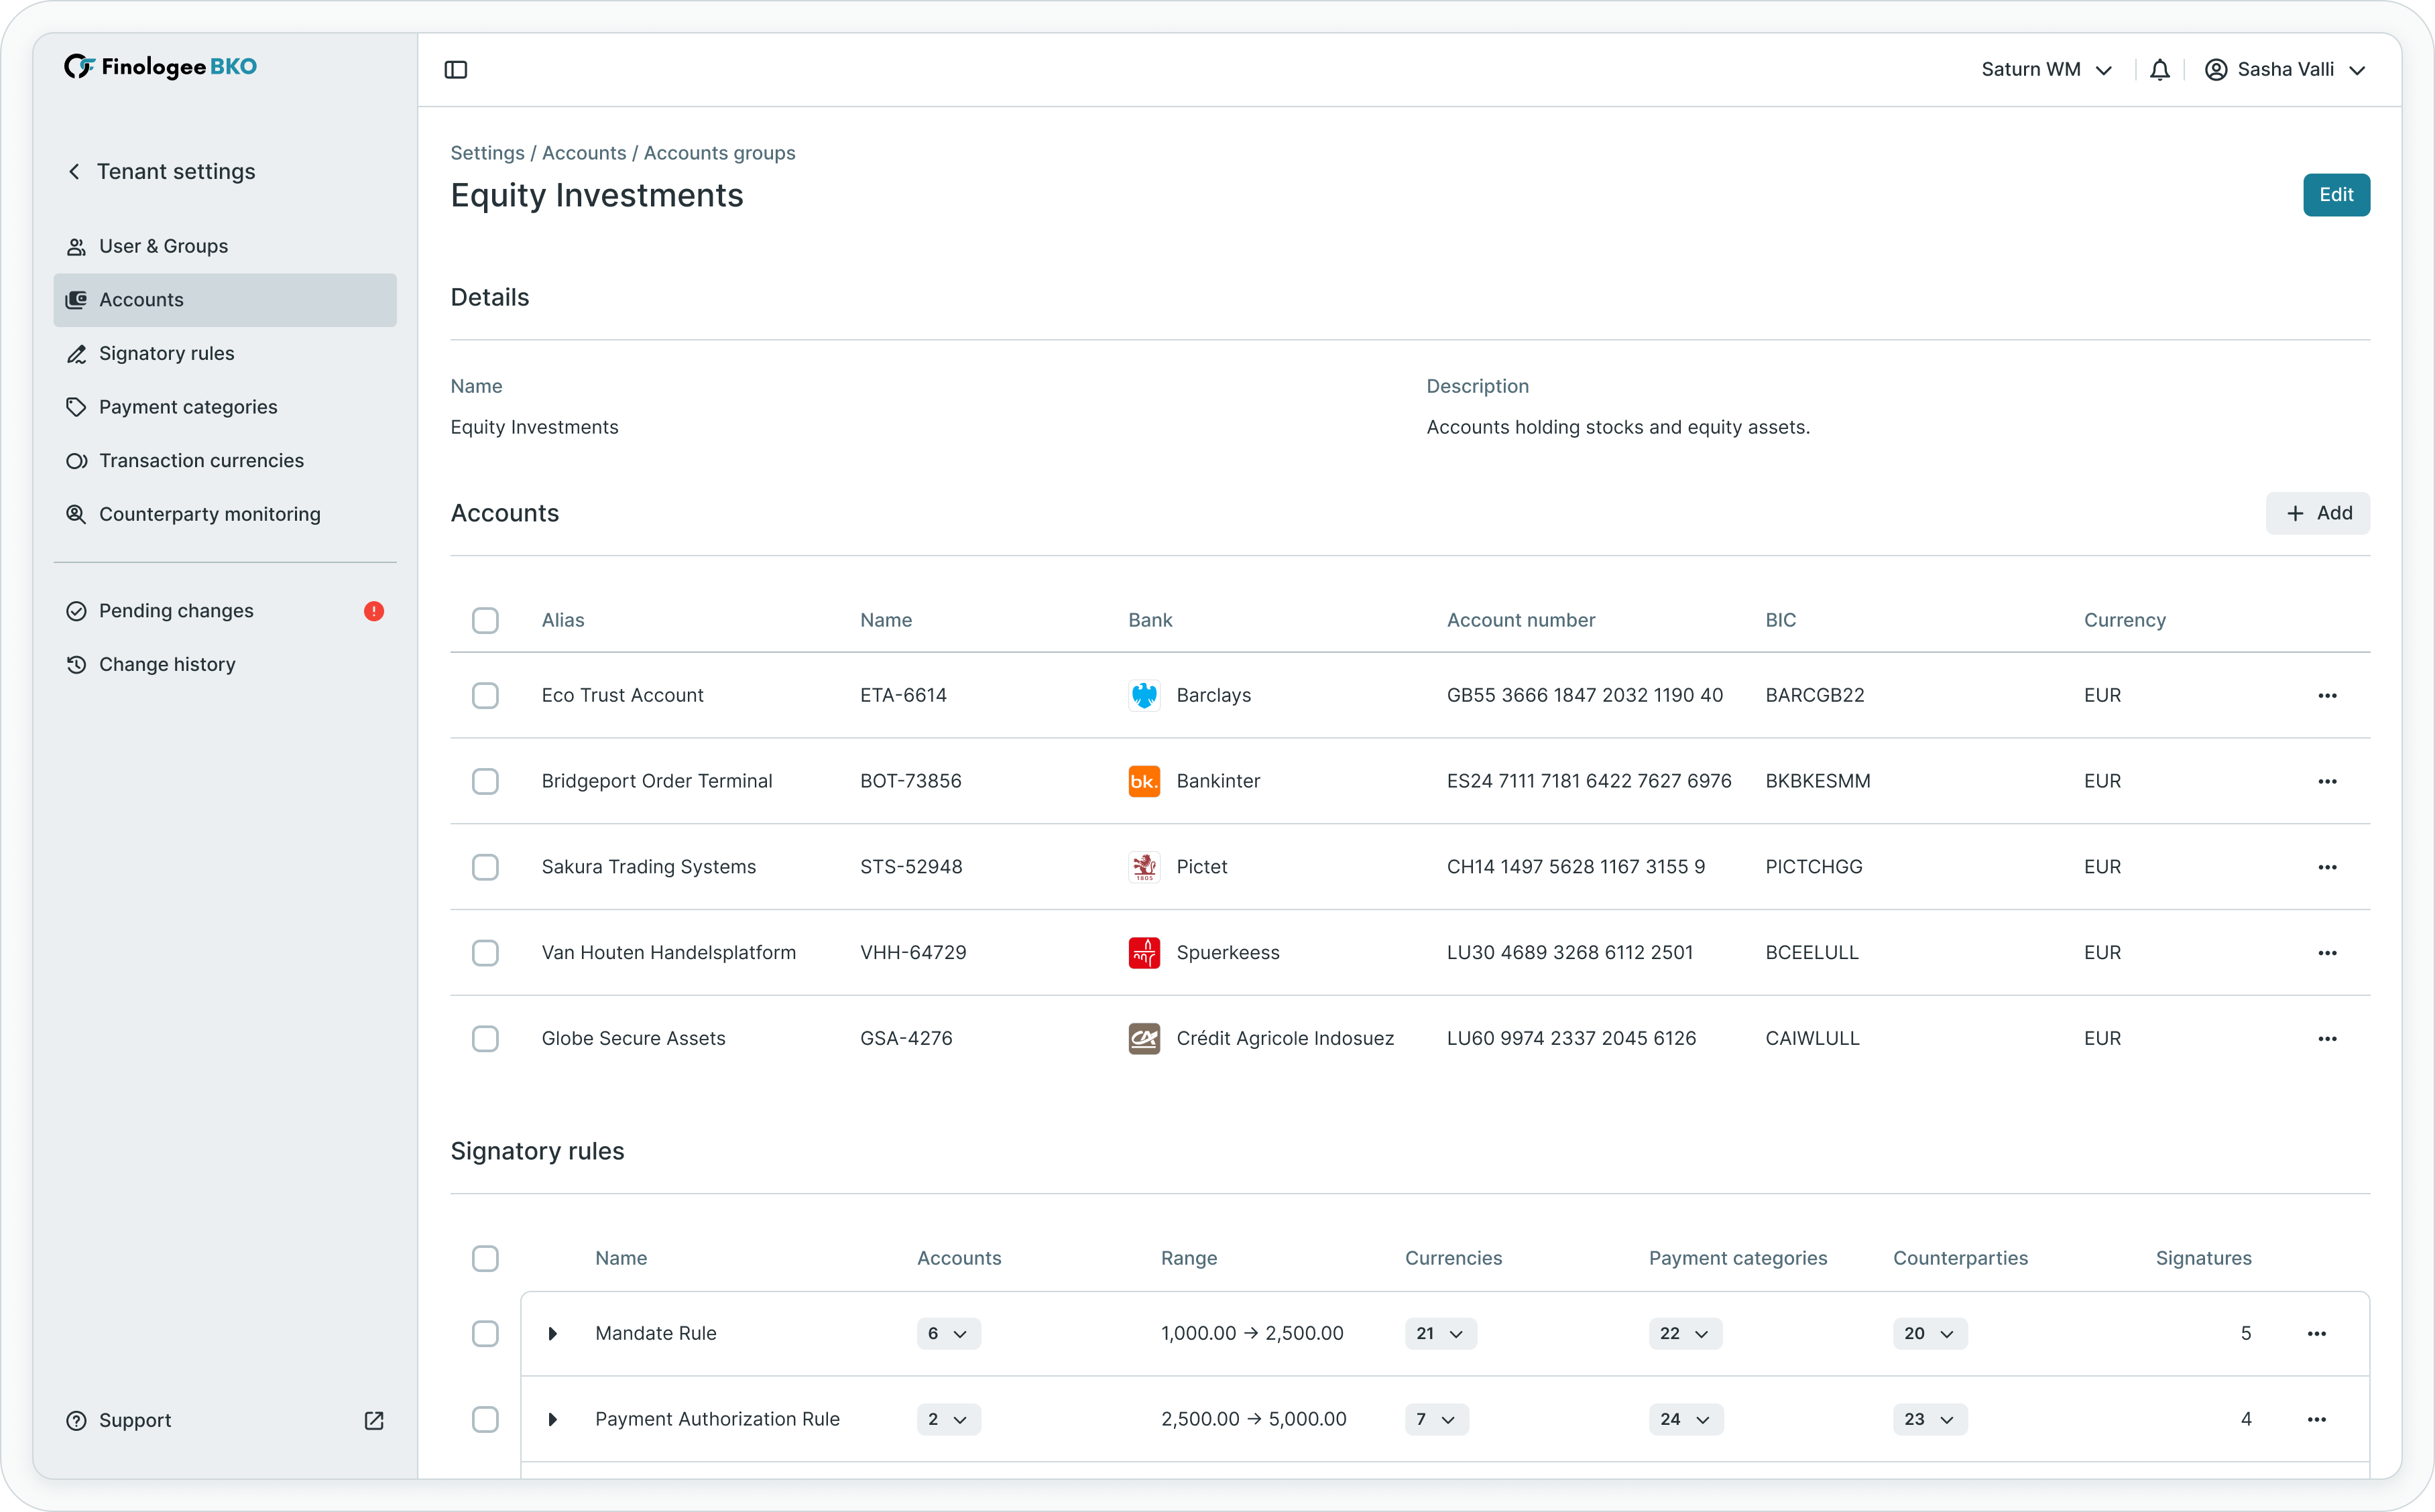
Managing group membership
Accounts can belong to multiple account groups simultaneously, enabling flexible organizational structures that reflect complex business relationships.
Adding accounts to groups
To add an account to one or more groups:
- Navigate to Tenant settings → Accounts
- Locate the account in the list
- Click the action menu and select Add to groups, or open the account details and manage group membership from there
- Select the groups to which the account should belong
- Confirm the selection
Alternatively, from the account groups view, open a group and add member accounts directly.
Removing accounts from groups
To remove an account from a group:
- Navigate to the account details or account group details
- Locate the group membership section
- Click the remove action on the group membership to be removed
- Confirm the removal
Approval workflowWhen the four-eyes review feature is enabled, group membership changes require approval before taking effect. This ensures proper oversight of organizational structure changes.
Deactivating accounts
Accounts that are no longer needed can be deactivated through the settings interface. Deactivation is a permanent action that cannot be reversed.
Deactivation process
To deactivate an account:
- Navigate to Tenant settings → Accounts
- Locate the account to deactivate
- Click the action menu and select Deactivate, or open the account details and click Deactivate
- Confirm the deactivation
Account deactivation is permanentOnce an account has been deactivated, it cannot be reactivated. Any pending payments associated with the deactivated account that have not yet been sent to the bank will be automatically cancelled. Review all pending transactions before deactivating an account.
Considerations before deactivation
Before deactivating an account, verify:
- No pending payments are awaiting authorization or bank submission
- No standing orders reference the account
- No cash concentration rules depend on the account
- Signatory rules do not exclusively reference the account (which would create gaps)
- Users are informed of the change if they regularly work with the account
Status definitions
Bank accounts progress through the following statuses:
| Status | Definition |
|---|---|
| Active | Fully operational account, available for use in payments and visible in bank account views |
| Pending | Account added and awaiting automatic activation once bank connectivity is confirmed |
| Pending bank connectivity | Account added for a bank without routing configuration yet in place; awaiting connectivity setup before activation |
| Deactivated | Account disabled and unavailable for new payments |
Search and filtering
The accounts list supports search and filtering to help administrators quickly locate specific accounts or identify accounts meeting certain criteria.
Search capabilities
The search function enables quick lookup by:
- Bank name
- Account number (IBAN)
- Ordering party name
- Account alias
- Statement matching number
Filter options
Advanced filtering options include:
| Filter | Description |
|---|---|
| Bank | Filter by banking institution |
| Currency | Filter by account currency |
| Country | Filter by country of jurisdiction |
| Balance range | Filter by balance thresholds (minimum/maximum) |
| Account group | Filter by group membership |
| Status | Filter by account status (Active, Pending, Pending bank connectivity, Deactivated) |
For more information about table filtering and customization, see Platform Navigation - Detailed guide to the head-up display, table views, filters, and search functionality.
Integration with other features
Account configuration in Tenant Settings integrates with several other FinologeeBKO features, providing centralized control that impacts multiple areas of the platform.
Signatory rules
Account groups can be used as parameters when defining signatory rules, enabling approval requirements to be specified at the group level rather than for individual accounts. This simplifies signatory rule management and ensures consistent approval workflows across related accounts.
For signatory rule configuration, see Signatory Rules - Approval workflow configuration.
Permission scoping
User permissions can be scoped to specific accounts or account groups, controlling which accounts users can view or interact with. This enables fine-grained access control based on organizational responsibilities.
For permission configuration, see Users & Groups - User management and permission assignment.
Cash concentration
Cash concentration automation rules reference accounts configured in this section. Account groups can be used to define sweeping relationships and fund flow hierarchies.
For cash concentration configuration, see Cash Concentration - Automated liquidity management.
Best practices
Follow these recommendations to maintain effective account configuration:
- Use meaningful aliases - Configure aliases that clearly identify accounts within your organization, making account selection easier for users creating payments
- Establish logical groupings - Create account groups that reflect your organizational structure, enabling efficient permission and signatory rule management
- Monitor pending accounts - Review accounts in Pending or Pending bank connectivity status regularly to confirm bank connectivity is established promptly
- Validate bulk upload files before submission - Check the bulk upload template for formatting and data accuracy to avoid a rejected batch
- Review before deactivation - Always verify no active transactions or automation rules depend on an account before deactivating it
- Document group purposes - Maintain internal documentation describing the purpose of each account group for administrative continuity
- Coordinate with signatory rules - When adding or removing accounts from groups, review the impact on existing signatory rules to avoid gaps or unintended overlaps
- Regular audits - Periodically review account configurations to ensure aliases, group memberships, and access permissions remain current and accurate
Related documentation
Explore these related sections to learn more about account management:
Core Concepts:
- Platform Navigation - Detailed guide to the head-up display, table views, filters, and search functionality - Tables, filters, search, and view customization
- Permissions - Comprehensive explanation of access control and role-based permissions - Understanding access control and account scoping
- Approvals - How approval workflows and signature processes function - Approval workflows for configuration changes
Platform Features:
- Cash Accounts - Account balances and bank statements - Viewing balances, transactions, and statements
- Cash Concentration - Automated liquidity management - Automated cash pooling using account structures
- Users & Groups - User management and permission assignment - User management and permission assignment
- Signatory Rules - Approval workflow configuration - Approval rules using account parameters
- Pending Changes - Configuration change management - Reviewing and approving configuration changes
- Change History - Audit trail for configuration - Audit trail for account configuration changes
Support
For assistance with account configuration, adding new accounts in your tenant, or questions about account management, contact [email protected].
Updated about 13 hours ago